
Učinak dima s gimpom - kako djeluje
Na Gimpu možete stvoriti impresivne dimne efekte i dopustiti da se pare i puše na vašim fotografijama. Upute i galeriju slika možete pronaći ovdje.
Gimp: Stvorite efekte dima pomoću IWarp filtra
- Otvorite Gimp i upotrijebite "Datoteka" za stvaranje novog dokumenta koji je otprilike veličine stupca dima - nešto više od dvostruke širine. Zatim ispunite pozadinu bijelom bojom. Na taj način možete bolje prepoznati dim kasnije dok radite na njemu.
- Sada dodajte novi sloj u izbornik slojeva s "New Layer ...", odaberite "Transparentnost" kao vrstu popunjavanja sloja u dijaloškom okviru i kliknite "OK".
- Postavite tamno sivu kao boju prednjeg plana i crtanjem debele okomite linije alatom četkom. Zatim upotrijebite svjetliju nijansu sive i manji polumjer četkice za crtanje drugog poteza (otprilike u sredini prvog). Nije važno da radite vrlo precizno, potezi se mogu lako izobličiti i izobličiti.
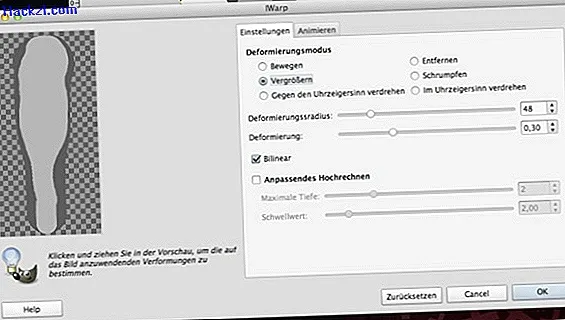
- Sada otvorite filtar "IWarp", koji ćete naći u izborniku "Filteri" pod "Filteri za distorziju". Odaberite način "Povećaj" deformacije i polumjer deformacije od približno 30 do 60.
- Sada se pomaknite u prozoru za pregled pritisnutom tipkom miša od sredine poteza do gornjeg ruba. Ponovite postupak, ako je potrebno, jedan ili dva puta, sve dok linija ne bude znatno deblja u gornjoj polovici nego u donjoj polovici.
- Sada prebacite način deformacije na "Smanji" i pomaknite se u prozoru za pregled pritisnutom tipkom miša prema dolje od sredine vašeg poteza. Kada ste zadovoljni rezultatom, kliknite "U redu".
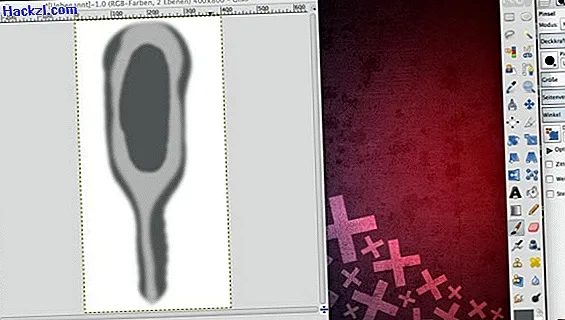
- Upotrijebite Gaussovo zamućenje da biste zamaglili sliku s radijusom od oko 10 do 20 piksela. Pronaći ćete "Gaussovu zamagljenost" u izborniku "Filter" pod "Zamagljivanje".
- Zatim pomoću kapaljke odaberite tamniju nijansu sive s vaše slike kao boje prednjeg plana i četkom nacrtajte oval u gornjem dijelu poteza. Opet, nije važno da djelujete posebno precizno.
- U izborniku "Filter" kliknite na "Ponovi Gaussovo zamućenje" kako biste ponovno omekšali svoju sliku prethodno postavljenim vrijednostima.
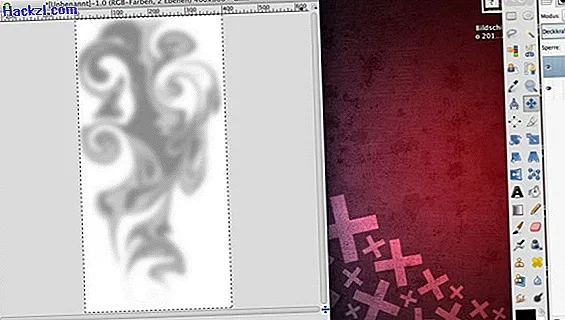
- Otvorite filtar "IWarp" ponovo, ali ovaj put odaberite način "deformacija" u smjeru suprotnom od kazaljke na satu. U prozoru za pregled nekoliko puta držite pritisnutu tipku miša i pomičite potez nekoliko puta prema gore i dolje sve dok virovi ne nalikuju oblaku dima. Zatim kliknite "U redu".
- Sada ponovo primijenite Gaussovo zamućenje, postavljajući radijus od 20 do 30 piksela.
- Sada možete kopirati sloj na kojem se nalazi vaš dim i zalijepiti ga na drugu sliku. Čitava stvar izgleda još realnije ako u novom dokumentu malo smanjite neprozirnost sloja dimom. Pojedine korake možete pročitati u našoj galeriji slika.

Saznajte kako stvoriti užareno zvjezdano nebo pomoću Gimpa u ovom praktičnom savjetu.
Najnoviji videozapisi
Napravite prozirni sloj na bijeloj pozadini.

Nacrtajte dvije okomite crte različite debljine koristeći različite nijanse sive.

Upotrijebite IWarp filtar u načinu deformacije "povećaj" i "smanji" da biste definirali grube obrise vašeg oblaka dima.
Uredite intermedijarni rezultat s Gaussovim zamagljenjem.

Nacrtajte tamno sivi oval na vrhu poteza i ponovo primijenite Gaussovo zamagljivanje.
Upotrijebite IWarp filter za umetanje vrtloga u način deformacije "protiv rotacije u smjeru kazaljke na satu".

Napokon, ponovno omekšajte svoj dim.
Ako želite zalijepiti oblak dima u drugu sliku, malo smanjite neprozirnost sloja koji sadrži dim.
