
Google kalendar: događaj izbrisan - što učiniti?
Ako ste slučajno obrisali važan sastanak iz Google kalendara, unos se trajno ne gubi. Pokazat ćemo vam kako ga ovdje možete vratiti.
Google kalendar - odmah poništi brisanje događaja
Sve dok još niste izvršili nijednu drugu radnju kalendara, možete poništiti brisanje. Da biste to učinili, jednostavno kliknite vezu "Poništi" koja se pojavljuje iznad kalendara.

Google kalendar - vraćanje izbrisanih termina s Java programom "Poništi događaje"
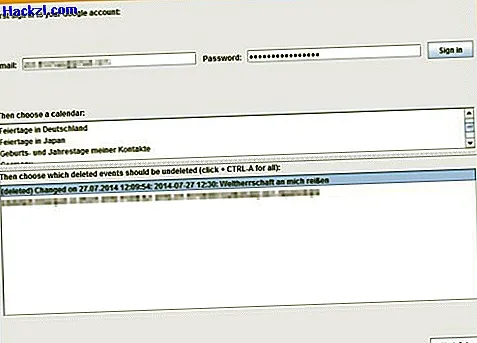
Ako vjerujete Googleu, izbrisani sastanak više se ne može lako vratiti ako je izbrisan i veza za poništavanje više nije prikazana. Srećom, to nije istina. Programer Dominique Andre Gunia (CalenGoo) nudi praktični Java program za oporavak izbrisanih obveza na njegovoj početnoj stranici. Da biste to iskoristili, na vašem sustavu mora biti instalirano Java Runtime Environment.
- Otvorite vezu //www.calengoo.com/webstartUndeleteEvents/undeleteevents.jnlp u svom web pregledniku i preuzmite datoteku.
- Pokrenite datoteku "undeleteevents.jnlp". Možda ćete trebati prilagoditi Java sigurnosne postavke da bi program radio.
- U odgovarajuća polja unesite svoju adresu e-pošte i Google lozinku. Zatim kliknite na gumb "Prijava".
- Program vam sada prikazuje kalendare koji su dodijeljeni vašem računu. Odaberite kalendar iz kojeg ste izbrisali sastanak.
- Sada ćete vidjeti pregled svih obveza koje su nedavno izbrisane. Odaberite termin koji želite vratiti i kliknite "Poništi". Također možete označiti nekoliko obveza i zatim ih vratiti u isto vrijeme.
- Ažurirajte Google kalendar u svom pregledniku.
Google kalendar - vratite izbrisane termine pomoću web aplikacije "Spanning Poništi"
Tvrtka Spanning nudi besplatan alat pomoću kojeg također možete vratiti izbrisane obveze u svoj Google kalendar. Alat radi u potpunosti u pregledniku, preuzimanje nije potrebno:
- Otvorite vezu //freetools.spanning.com/undelete/signin.
- Prijavite se svojim Google korisničkim podacima i prihvatite da aplikacija "Spanning Poništi povrat za Google kalendar" može pristupiti vašim podacima.
- Odaberite kalendar iz kojeg ste izbrisali sastanak. Sada ćete vidjeti pregled svih izbrisanih termina. Označite jedan ili više sastanka kvačicom. Zatim kliknite na "Poništi".
- Odaberite jesu li obveze označene "[UNDELETED]" i treba li bilo koju pozivnicu ponovo poslati. Zatim ponovo kliknite "Poništi".

Google kalendar - ručno vratite izbrisane obveze
Pojedinosti izbrisanog sastanka možete vidjeti i putem izmijenjene privatne adrese vašeg Google kalendara i na temelju toga stvoriti novi sastanak:
- U pregledu "Moji kalendari" s lijeve strane pomaknite pokazivač miša na kalendar iz kojeg ste izbrisali sastanak. Sada kliknite desnu strelicu i odaberite "Postavke kalendara".
- U području "Privatna adresa" kliknite narančasti XML gumb. Zatim kliknite prikazani URL.
- Na kraj URL-a dodajte niz "? Showdeleted = true & showhidden = true" (bez navodnika), a zatim pritisnite [Enter].
- Sada ćete vidjeti XML stranicu vašeg kalendara, koja također prikazuje izbrisane i skrivene obveze. U Chromeu vide samo zbunjujući XML kôd, Firefox, Opera ili Internet Explorer su prikladniji.
- Stvorite novi sastanak u Google kalendaru na temelju prikazanih podataka.

Ako imate problema s usklađivanjem Google kalendara sa Android pametnim telefonom, savjeti u ovom praktičnom savjetu će vam pomoći.